Hello all!! Welcome to my BAP! I am using most all products from the June KOM. However what I am gonna show you is how to stretch those beautiful PP and also some need things to do with them Martha punches! Ok Lets get started shall we!
Step 1:
CS base, I used the White washed CS from the kit. I used my corner rounder punch and rounded all of the corners. Then I distressed it with some Prima Chalk ink Dark Bark ( You can find this in the Flying Unicorn store or something really close if you don't already have some). Here is the pic.
Step 2:
Now I grabbed a piece of brown CS from my stash and used the MS ribbon loops punch and punched around all the edges. (Note: if you are having a problem with these punches not working out correctly check the size of your CS or PP it has to be a true 12x12 pieces or the sizes mentioned on the paper that comes with the punch). Then remove the center with your paper trimmer leaving about a 1 1/2 inside. This measurement doesn't have to be exact but close. Here is the pics for this process..
Step 3:
Now I used the Prima Fairy Belle PP that came with the kit. I also used a piece that I had left over from a project I was working on. It is a Piece of the Bo Bunny Country Garden that came in the kit. The size of the piece was 7x12 piece. I Cut that piece into 2 pieces one that is 2 1/2 x 11 1/2 and the other 4 1/2 x 11 1/2.
Then I took my MS decorative hearts punch and punched down both sides of each piece. I carefully lined the punch up where the patterns matched on each side. I lightly inked the edges of each piece.
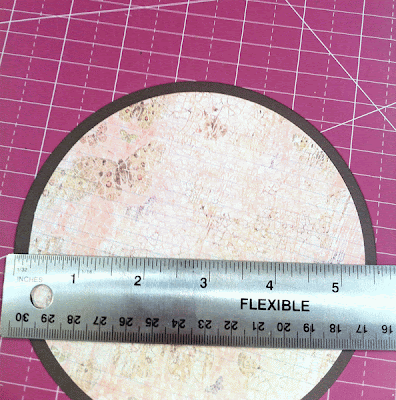
After this was done, using the whole piece of pp. I cut 1/2 inch off of the right side of the pp and 1/2 inch off the bottom. This keeps your piece square. Then round each corner of this piece, ink and distress. I did some water distressing at the top right corner. I used the strips up above and a doily ( 8 inch) to gauge were I would cut a circle from the pp. I carefully removed the strips and held the Doily in place made tick marks and cut it out with a circle cutter. Then this layer is ready to be attached and tuck3 flowers from the kit (Prima Fairy Belle ones)under water distressed corner. Here is the pics of this process.
Step 4:
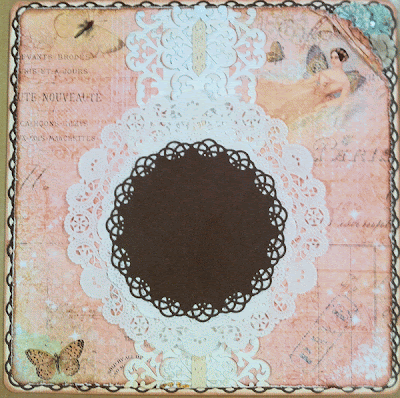
I took the narrower piece with the punched hearts and ran the middle Hero arts lace from the kit through it. Then attached the wide one first then the narrow one. Then I added a 8 inch doily and a 6 inch doily on top of one another where I cut out the hole. Here is the pics of this process..
Step 5:
I then took the left over brown CS and cut a circle from it about 1/4 inch bigger than the piece that was removed from the pp. Here is the pic to give you a idea..
Step 6:
Using my corner MS ribbon loop punch and created a doily with it. You keep the corners closed in on the punch. Do this face up so you can see the placement of the punch. Placement is very important to get it to look correct. You hold the punch where the edge of the design is at the edge of the circle and the corner of the design is barely and I mean barely touching the last punched area. I did this all the way around my brown CS circle and added it to the 6inch doily center. Here is some pics that can give you a idea about this process..
Step 7:
I then used the pp circle inked and distressed it and added it to the top of the brown piece. Notice that the whole punched pieces are not showing. just the tip edge. I really liked the hit of it peaking out. I used one of the rubbons and added it to the top right corner of the circle. I used where I was gonna place my pic and blooms as guides to where the rubbon piece was gonna go and attached it. Here is the pics of this process..
Step 8:
I used the last big area of the center brown CS piece and matted my photo with it. Then went around my pic with the narrowest lace that was in the Hero Arts pac that was in the kit. I took the matted photo and ran the lace up the edge and snipped a little piece from the corners so it would turn properly. Did this all the way around the pic. I used quick drying glue to attach it with. I also used foam tape to attach it to the LO to give the pic more height. Here is the pics to this process..
Step 9:
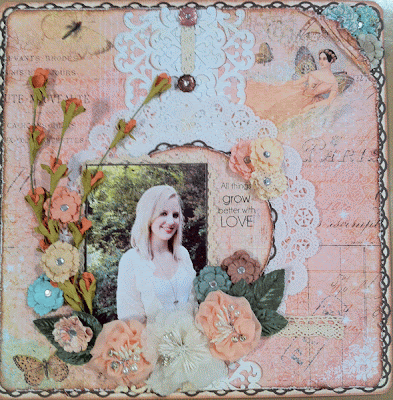
I used the rest of the Prima flowers a Petaloo vine, and leaves that was in the kit and attached those around the photo. Then sniped a little piece of the widest lace from the Hero Art pac and attached it to the farthest leaf . Also used 3 of the MM art deco brads from the kit as well, spacing at the empty spots through the center of the punched pieces. A pic of this process..
Step 10:
I used 3 big blooms from my stash (all are Manor House and can be found in the Flying Unicorn store) and attached them right below the pic. I also used the Kaisercraft die cut shapes and the Bo Bunny letters to create a title area. I inked the edges to these pieces with the same ink and a darker shade as well. Attached these pieces together and added foam tape to the back of it. Attached these as well as some fussy cut butterflies that came from the butterfly file that Alda put in the files section. I edited the ones that I liked and wanted to use in photoshop to make large and smaller butterflies. Here is the pics of this process and final result.
I hope that you liked it, and learn how to stretch your PP! Maybe some ideas and techniques on using those MS punches! Have fun and can't wait to see what you create! Hugs!!
Step 1:
CS base, I used the White washed CS from the kit. I used my corner rounder punch and rounded all of the corners. Then I distressed it with some Prima Chalk ink Dark Bark ( You can find this in the Flying Unicorn store or something really close if you don't already have some). Here is the pic.
Step 2:
Now I grabbed a piece of brown CS from my stash and used the MS ribbon loops punch and punched around all the edges. (Note: if you are having a problem with these punches not working out correctly check the size of your CS or PP it has to be a true 12x12 pieces or the sizes mentioned on the paper that comes with the punch). Then remove the center with your paper trimmer leaving about a 1 1/2 inside. This measurement doesn't have to be exact but close. Here is the pics for this process..
Now I used the Prima Fairy Belle PP that came with the kit. I also used a piece that I had left over from a project I was working on. It is a Piece of the Bo Bunny Country Garden that came in the kit. The size of the piece was 7x12 piece. I Cut that piece into 2 pieces one that is 2 1/2 x 11 1/2 and the other 4 1/2 x 11 1/2.
Then I took my MS decorative hearts punch and punched down both sides of each piece. I carefully lined the punch up where the patterns matched on each side. I lightly inked the edges of each piece.
After this was done, using the whole piece of pp. I cut 1/2 inch off of the right side of the pp and 1/2 inch off the bottom. This keeps your piece square. Then round each corner of this piece, ink and distress. I did some water distressing at the top right corner. I used the strips up above and a doily ( 8 inch) to gauge were I would cut a circle from the pp. I carefully removed the strips and held the Doily in place made tick marks and cut it out with a circle cutter. Then this layer is ready to be attached and tuck3 flowers from the kit (Prima Fairy Belle ones)under water distressed corner. Here is the pics of this process.
Step 4:
I took the narrower piece with the punched hearts and ran the middle Hero arts lace from the kit through it. Then attached the wide one first then the narrow one. Then I added a 8 inch doily and a 6 inch doily on top of one another where I cut out the hole. Here is the pics of this process..
Step 5:
I then took the left over brown CS and cut a circle from it about 1/4 inch bigger than the piece that was removed from the pp. Here is the pic to give you a idea..
Step 6:
Using my corner MS ribbon loop punch and created a doily with it. You keep the corners closed in on the punch. Do this face up so you can see the placement of the punch. Placement is very important to get it to look correct. You hold the punch where the edge of the design is at the edge of the circle and the corner of the design is barely and I mean barely touching the last punched area. I did this all the way around my brown CS circle and added it to the 6inch doily center. Here is some pics that can give you a idea about this process..
Step 7:
I then used the pp circle inked and distressed it and added it to the top of the brown piece. Notice that the whole punched pieces are not showing. just the tip edge. I really liked the hit of it peaking out. I used one of the rubbons and added it to the top right corner of the circle. I used where I was gonna place my pic and blooms as guides to where the rubbon piece was gonna go and attached it. Here is the pics of this process..
Step 8:
I used the last big area of the center brown CS piece and matted my photo with it. Then went around my pic with the narrowest lace that was in the Hero Arts pac that was in the kit. I took the matted photo and ran the lace up the edge and snipped a little piece from the corners so it would turn properly. Did this all the way around the pic. I used quick drying glue to attach it with. I also used foam tape to attach it to the LO to give the pic more height. Here is the pics to this process..
I used the rest of the Prima flowers a Petaloo vine, and leaves that was in the kit and attached those around the photo. Then sniped a little piece of the widest lace from the Hero Art pac and attached it to the farthest leaf . Also used 3 of the MM art deco brads from the kit as well, spacing at the empty spots through the center of the punched pieces. A pic of this process..
Step 10:
I used 3 big blooms from my stash (all are Manor House and can be found in the Flying Unicorn store) and attached them right below the pic. I also used the Kaisercraft die cut shapes and the Bo Bunny letters to create a title area. I inked the edges to these pieces with the same ink and a darker shade as well. Attached these pieces together and added foam tape to the back of it. Attached these as well as some fussy cut butterflies that came from the butterfly file that Alda put in the files section. I edited the ones that I liked and wanted to use in photoshop to make large and smaller butterflies. Here is the pics of this process and final result.
I hope that you liked it, and learn how to stretch your PP! Maybe some ideas and techniques on using those MS punches! Have fun and can't wait to see what you create! Hugs!!


